Monday, November 29, 2010

Photoshop Tutorial No. 003


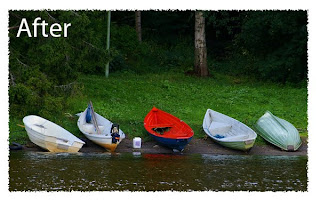
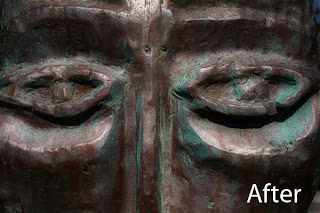
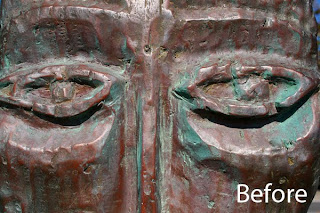
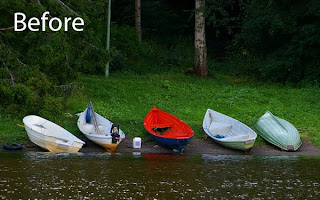
Shadow Diffusion

In the far off days before the dawn of digital photography, photographers were forced to use that old fashioned medium called film. The production of prints from this strange medium required the use of a darkroom, a secret space where the photographer practiced what were known as the "black arts". Every so often a cry of "Eureka!" would emanate from within the hallowed space and the world would understand that another great masterpiece had just been born. It wasn't unusual for the photographer/printer to place a mesh such as a ladies nylon stocking over the enlarger lens in order to diffuse the highlights. Less commom though was the practice of using a black nylon over the camera lens in order to diffuse the shadows rather than the highlights. Thankfully, we now have an easier way to do the same job in the comfort of our own living room and using our computer. Here's how to, using Photoshop.

1. Open your image and immediately duplicate the background

2. With the duplicate layer highlighted, go to, Image....Adjustments....Invert

3. Now, go to, Filter...Distort.... Diffuse Glow

Try figures of 4, 5 and 15 in the resultant dialogue box

4. Now, go back again to, Image....Adjustments....Invert

5. This has now reverted your image back to a positive

6. If necessary, reduce the opacity of the duplicate layer to suit your own taste.

7. Now, flatten your image and save

Note that in your resultant image the shadows will have diffused or spread into the highlights
Friday, November 19, 2010

Photoshop Tutorial No. 002


A Rippled Edged Print


Sometimes it's nice to vary the edge of the photo to provide variety from the normal straight and hard edges. Here is a very simple method to make an interesting edge effect, quickly and reliably:

1. Open Image and using the Rectangular Marquee tool, draw a rectangular selection which leaves just a thin border outside the selection.

2. Click on the Quick Mask Icon in the toolbox (Keyboard Shortcut-"Q")

3. Go to Filter...Brush Strokes...Spatter (As alternatives, try experimenting with, Filter...Distort...Glass, or Ocean Ripple) Choose any settings which please

4. Return to Standard Editing Mode KKeyboard Shortcut-"Q"

5. Select... Inverse

6. Press the Delete Key

7. Select...Deselect

8. Save or Save As.

Photoshop Tutorial No. 001


An Alternative Extract Method

There are many occasions when we might want to lift an object out of one photo and drop it instead into a second file. The problen here is getting a nice clean edge to the cut out, so that the end result doesn't look too contrived. There are many methods of achieving the same goal and they all work although not always equally successfully. Much depends on the original photo, so it's a good idea to practice every method you come across. You never know when that technique might be the only life saver around. Photoshop ships with the EXTRACT tool as part of the filters set although goodness knows why because it isn't a filter as such, more like a mini programme within a larger one. Extract works ok but it can be fiddly and a difficult tool to master, so here is an alternative method which I have found works very nicely, especially when the background isn't too complicated. It would be perfect for example in lifting a person out of a studio setting ready for dropping into some other scene. Here goes with the step by step :

Please note that in the "Before" example above the background is very fussy and would not easily be selectes using the Magic Wand. In such a photo the Polygonal Marquee would suit better since the edges to be selected consist of straight lines. The instructions below are more apt in a situation where the background to be removed is plainer.

1. Open the image and immediately duplicate the background layer.

2. In the layers palette, double click on the background layer and rename it as "Layer 0".


3. Using the Background Copy Layer, select the background using the magic wand tool. Try the default tolerance of 32, but if this results in "grabbing" too much, reduce the tolerance until it works better for you. Use shift and click to add to the selection and Alt and click to subtract from it.

4. Go to "Select" and then "Inverse".

5. Go to... Window.....Channels and make an Alpha Channel by clicking on the folded paper icon at the bottom of the channels window.

6. Go to..."Edit"....."Stroke" and using a setting of 4 pixels,and with white as the foreground colour and the centre option selected, click OK.

7. Go to "Select"....."Deselect".

8. Go to..."Image"...."Adjustments"....."Invert"

9. Return to the channels palette, activate the RGB channel and close the palette.

10. Go to..."Filter"...."Extract".

11. In the Extract window which has now opened up. choose the Alpha1 channel in the selection box on the right hand side.

12. Use the extraction fill tool (the paint bucket icon) to fill within the highlighted area and click OK

13. Back in the Layers Palette, delete Layer0 (The original background layer)


14. Use the remaining layer or save it for future use.