
Straightening Buildings etc.
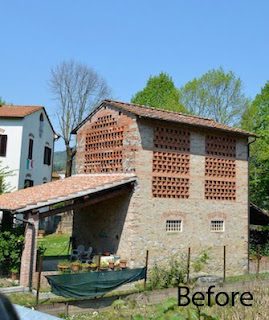
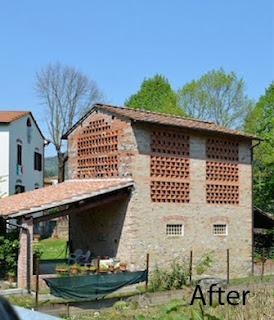
The sample photo being used here was shot by a fellow contributor to Blipfoto, a site which encourages participants to upload one photo per day and as you can see it contains some lovely sunshine and a very unusual old barn in the countryside of Tuscany, Italy. What upset my friend and which led directly to this little tutorial is the fact that the buildings and particularly the white house on the left hand side were not square on to the axis of the camera and therefore there is a pronounced lean to the right.
This is a common happening and the most obvious example would be when photographing a painting or indeed a photo. Not to fear though. With digital capture and software this is easily fixed. There are many methods but this one is easy to use and available in pretty well any version of Photoshop. How do we go about it?
1. Start off by opening up your photo and making it as big as it will go on your screen. Select the magnifying glass and click on "Fit on Screen" to achieve this.
2. Now, back off a little so that you leave yourself room in which to work. To do this, hold down the Alt key on the keyboard and you will see that your magnifying glass will change from a plus sign to a minus. Still holding Alt down, click once on the photo.
3. Now, go to Select and Select All.
4. Next, go to View...Show, and from the flyout menu tick Grid. You will now have a grid overlaying your photo. This will make it easier to align elements which should be vertical and/or horizontal in the photo with the grid for accuracy.
5. If the grid is too confusing or for that matter contains too few lines just go along to Edit...Preferences... Guides, Grid and Slices and play about with the "Gridline every so many inches" and the "Subdivisions" boxes until you have a grid which looks suitable for your purpose. You can even change the colour of the grid here too and its appearance...whether it appears as solid lines or as lines of dots. It's entirely your choice.
6. Ready for the magic? Go to Edit...Transform....Skew.
7. You will see 8 small boxes, or handles, appear on your photo. One at each corner and one at the midpoints of each of the four sides.
8. Find a vertical in your shot, which is obviously off and select a corner handle nearby. In the case of our example here I used the slanting wall of the white house and the top left handle.
9. Click on the handle with the mouse and holding the click down, drag the handle, in this case, to the left until the corner of the house lines up as best as possible with the nearest vertical grid line. It doesn't of course have to be touching the grid line, just judge it by eye.
10. Now check carefully all over your image, looking for any verticals or horizontals which you may have upset with your first move. If there are any, tweak them in similar fashion until you have achieved what you want.
11. When you have time to practice, check out what happens when you drag a corner handle vertically rather than horizontally and for a bit of a surprise practise sliding the handles on the perimeters up/down or left/right depending on which outer line they are on.
12. When you are happy, hit the Enter key to accept the changes. Go to Select...Deselect and then to View...Show...Grid and untick the Grid box.
13. Before you save your newly corrected image just check that you haven't left yourself with any bits of stray white most likely in the corners. If you have, you will need to crop inside these to remove them or if you are feeling like fun try cloning them out instead. You are now ready to save your new masterpiece.
No comments:
Post a Comment